How to Fix a Leaking Roof Causing Water Damage: Complete Solution Guide
A leaking roof is one of the most damaging and costly water issues a homeowner can face. Unlike localized water damage from appliances or pipes, roof leaks affect multiple building systems and can compromise your entire home’s structure. This comprehensive guide covers finding the leak source, implementing temporary and permanent fixes, addressing interior water damage, and navigating insurance considerations.
Key Takeaway: The visible ceiling stain is rarely directly below the actual roof leak — water travels along rafters and wiring, often 4-10 feet or more from the entry point, so always investigate from the attic side to trace water back to its true source before making any repairs.
Understanding Roof Leaks and Water Damage
How Roof Leaks Occur
Roof leaks develop when the protective barrier created by roofing material, underlayment, and flashing fails. Water then penetrates the sheathing beneath roofing material, travels along rafters and supports, and eventually appears as water stains or damage in living spaces.
The leak location often differs significantly from where water appears inside. Water may travel horizontally along rafters, follow wiring or pipes, or seep through framing before emerging in the ceiling or walls. Tracing water back to its source requires systematic investigation.
Types of Roof Leaks
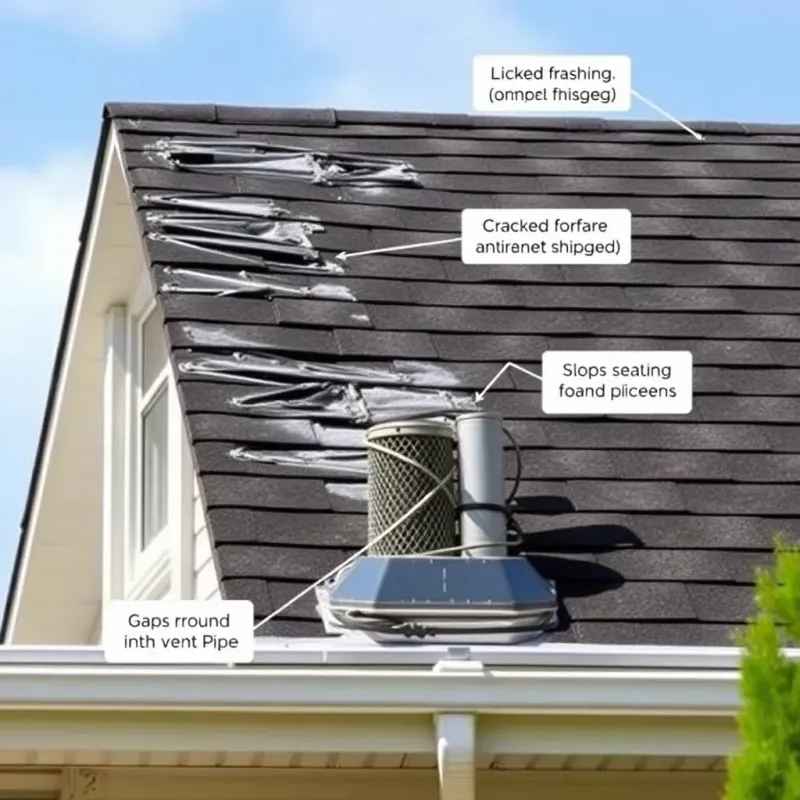
Penetration leaks occur around anything that penetrates the roof: chimneys, vents, skylights, dormers, and flashing points. These are the most common sources.
Membrane leaks affect the roofing material itself, often from missing shingles, cracked shingles, or deteriorated tar and gravel on flat roofs.
Seam and flashing leaks occur where different roofing sections meet or where metal flashing connections have failed.
Interior condensation can resemble roof leaks but actually results from humidity differences between indoor and outdoor air. The “leak” appears along the attic-ceiling interface.
Reverse leaks occur during storms with extreme wind-driven rain that forces water backward under shingles or past flashing.
Why Roof Leaks Are Critical
Unlike localized water damage, roof leaks affect large areas. Water infiltrating your attic affects insulation performance, promotes mold growth, deteriorates roofing sheathing, and can damage framing and structural integrity.
Water damage from roof leaks often extends beyond visible areas. By the time stains appear on ceilings, the water has already traveled through insulation, framing, and wall cavities. This hidden damage accelerates mold growth and structural deterioration.
Finding the Roof Leak Source
Locating the leak is the crucial first step toward resolution.
Interior Investigation
Attic inspection is your best tool for finding leaks. During or shortly after rain, go into the attic with a flashlight and look for:
- Active water dripping
- Water stains on sheathing, rafters, or joists
- Soft or damaged areas indicating prolonged water exposure
- Light penetrating from roof (indicating holes or major damage)
- Mold growth (often black, green, or white fuzzy material)
Mark any damage location with chalk or tape. Water stains indicate where leaks existed; fresh marks show current leak locations.
Ceiling inspection from inside the home reveals water stains indicating leak location above. Mark the center and edges of water stains. The actual roof leak is typically 4-10 feet above the ceiling stain, often higher on steeply pitched roofs.
Systematic tracing starts at water stains and works upward. Water flows downslope along rafters, so follow the rafter line upward to the roof. The leak is usually somewhere above the highest evidence of water damage.
Exterior Investigation
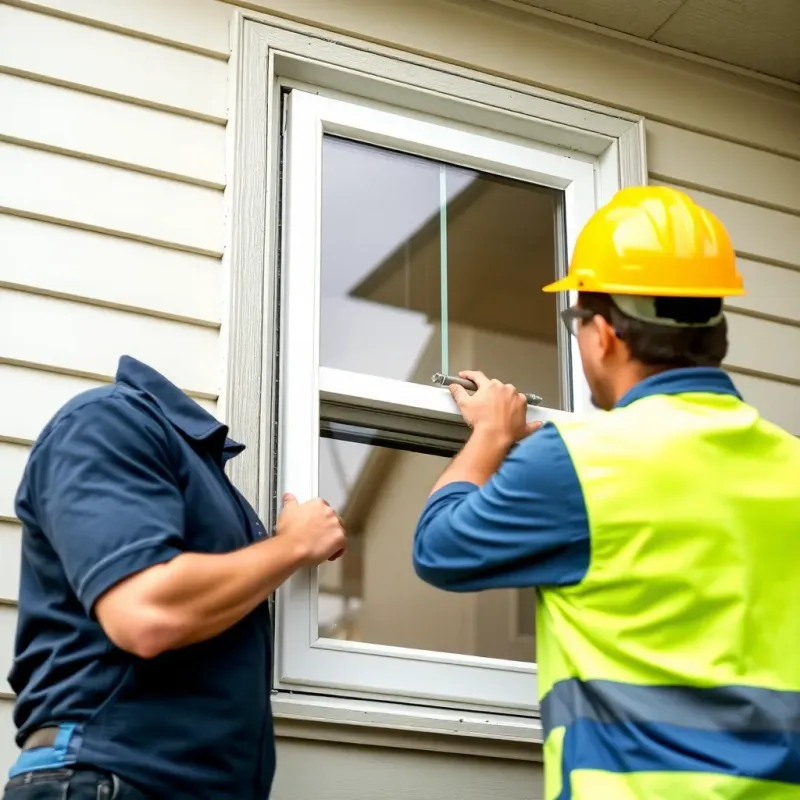
Safe roof inspection should only be attempted if you can do so safely. Never go on wet roofs. Always use proper fall protection.
From outside, look for:
- Missing or cracked shingles
- Deteriorated flashing around chimneys, vents, skylights, or dormers
- Gaps in caulking around penetrations
- Debris buildup in valleys where water drains
- Lifted shingles allowing water to enter from underneath
- Moss or algae growth indicating moisture retention
Water trace testing during repairs can help locate leaks. With a helper inside watching for water drips, spray water on suspected roof areas from the ground or a ladder. Direct water toward likely leak paths (like valleys or flashing edges).
From my years in the field, I always recommend starting the water test at the lowest point of the suspected area and working upward. Spraying too high first floods the area and makes it impossible to pinpoint the exact entry point. Patience during the water trace test saves you from making unnecessary repairs on the wrong section of roof.
Professional Leak Detection
If you cannot locate the leak, professional inspection may be necessary. Roofing contractors have equipment and experience to systematically trace water to its source. Many offer warranties on repairs, ensuring the leak is truly fixed.
Thermal imaging can identify temperature differences indicating moisture-saturated areas. This technology helps locate hidden leaks in insulation or behind finished surfaces.
Temporary Roof Leak Solutions
When permanent repairs aren’t immediately possible, temporary solutions prevent water damage from worsening.
Roof Tarping
Tarping the damaged roof area prevents water from entering during additional storms.
Measure the damaged area and add 6 feet in each direction to ensure adequate coverage. Tarps should overlap low areas by at least 6 feet to prevent wind-driven water from entering under the tarp edges.
Install the tarp by securing it with 2x4 lumber and weights (concrete blocks, sandbags) rather than nails or fasteners that create additional holes. Drape the tarp so it forms a valley directing water toward gutters.
Secure all edges so wind cannot lift them. Weight the downslope edge heavily, as this is where wind pushes hardest.
Check after storms to ensure the tarp remains in place and hasn’t collected water in low spots.
Temporary tarps often last only a few weeks before degradation, so permanent repairs should follow quickly.
Interior Water Management
Collect dripping water in buckets to prevent ceiling and wall damage from continuous water introduction.
Increase ventilation and air circulation with fans to accelerate drying of affected areas.
Use dehumidifiers in closed attics or enclosed spaces to remove moisture from air.
Apply mold-preventing treatments to exposed framing if mold is a concern, though this is temporary and doesn’t address the underlying problem.
Seal ceiling penetrations from below to minimize water spreading along wiring or pipes inside walls.
Permanent Roof Leak Repairs
Permanent repairs address the root cause, restoring the roof’s integrity.
Flashing Repairs
Flashing failure is the most common leak source.
Chimney flashing often fails at the cricket (the “roof within the roof” directing water around the chimney). Failed mortar joints allow water to enter. Repair requires re-caulking with chimney caulk or replacing the flashing if severely corroded.
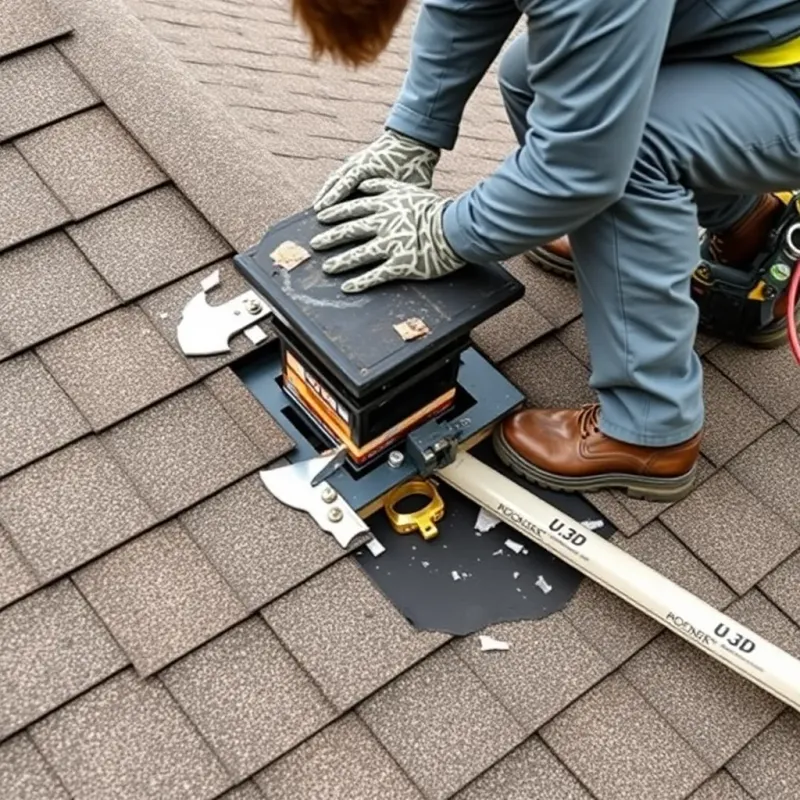
Vent flashing may have separated from the roof surface or developed holes. Replacement is typically necessary. The old flashing is removed, a new flashing of correct size is installed, and the perimeter is sealed with roofing tar and new shingles are applied over the upper edge.
Skylight flashing is complex because skylights have moving parts and multiple flashing levels. Repair often requires skylight manufacturer specifications. If leaks persist after re-caulking, replacement may be necessary.
Dormer flashing where the dormer roof meets the main roof is particularly vulnerable to reverse leaks during heavy rain. This area should have proper flashing and caulking maintained.
Shingle Replacement
For leaks from damaged shingles:
Remove damaged shingles by lifting the shingles above them and carefully prying out nails. Damaged shingles can then be removed.
Install replacement shingles of the same type and color. New shingles must match existing ones, which may be difficult if roofing is old. Salvage yards sometimes have old shingles or contractors maintain roofing salvage.
Nail correctly at the designated nail locations. Improper nailing is a common cause of shingle failure.
Seal penetrations where nails enter by applying roofing tar over nail heads.
Valley and Seam Repairs
Open valleys where two roof sections meet require careful sealing. Debris accumulation must be cleaned away, and any deteriorated flashing must be replaced.
Closed valleys formed by overlapping shingles may need careful roofing tar application or shingle replacement.
Seams in flat or low-slope roofs are particularly prone to leaks. Tar and gravel roofs may need tar reapplication in leaking areas. Membrane roofs may require patching or seam resealing.
Complete Roof Replacement
If your roof is near the end of its lifespan and multiple leaks exist, replacement is more economical than patching individual areas.
Most asphalt shingles last 15-25 years. If your roof is in this age range with multiple leaks, replacement prevents repeated repair costs.
Addressing Interior Water Damage from Roof Leaks
Once the leak is fixed, interior damage must be addressed.
Structural Assessment
Inspect framing and sheathing for soft spots, rot, or structural damage. Wood that feels soft when pressed has absorbed water and deteriorated. Extensive rot may require structural reinforcement or beam replacement.
Check for mold in all areas contacted by water. Mold appears as dark (black, green) or white fuzzy growth. Mold growing actively is a health hazard and must be professionally remediated.
Assess insulation damage. Fiberglass insulation loses R-value when wet. Mineral wool insulation retains some properties when wet. Severely water-damaged insulation should be replaced.
Mold Remediation
Small mold areas (under 10 square feet) can be cleaned with household mold cleaner and HEPA-vacuumed. However, mold indicates ongoing moisture, so identifying the moisture source is crucial.
Large mold areas (over 10 square feet) require professional mold remediation following EPA guidelines. Professionals have proper equipment to remove mold while containing spores.
Prevent recurrence by addressing the underlying moisture problem. If the leak is fixed but mold develops anyway, humidity or condensation issues may be present.
Drying and Moisture Control
Remove wet materials including insulation, drywall, or other materials that won’t dry within a few days.
Promote drying with:
- Commercial dehumidifiers to remove moisture from air
- Ventilation fans to move humid air out of the attic
- Heat (gentle—not above 80°F) to accelerate drying
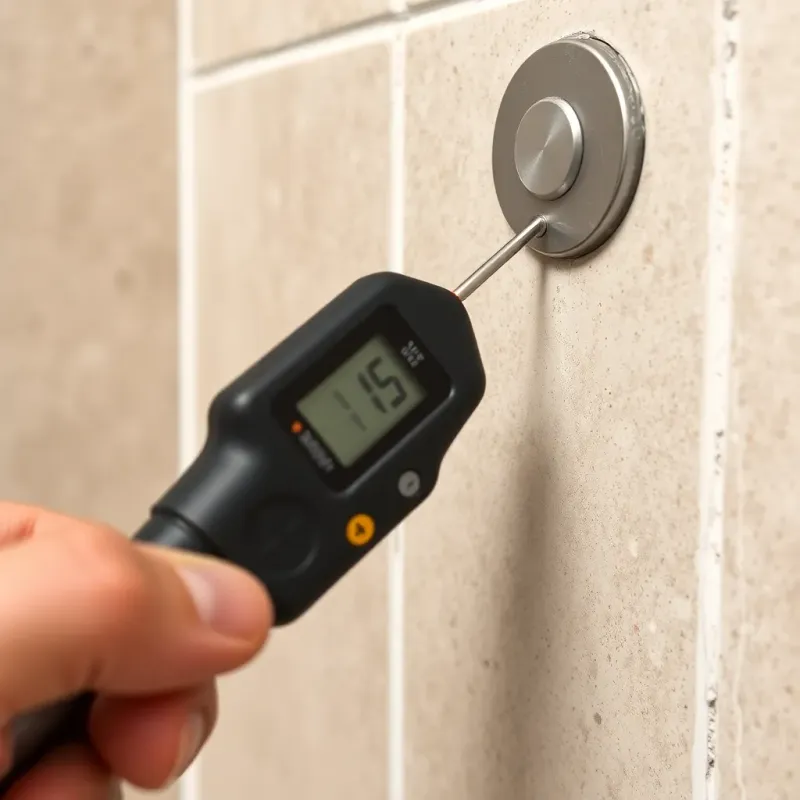
Monitor moisture with moisture meters to ensure materials reach acceptable moisture levels before enclosing walls or ceilings.
Ceiling and Wall Repair
Water-damaged drywall typically needs removal and replacement. Drywall damaged by water generally can’t be adequately dried and is prone to mold growth and continued deterioration.
Plaster walls may be repairable if water damage is limited. Extensive plaster damage may require professional restoration.
Paint and finish applied after structural issues are addressed and surfaces are dry. Paint alone doesn’t solve water damage problems.
Insurance and Roof Leak Damage Claims
Coverage Considerations
Most homeowner insurance policies cover sudden, accidental water damage from roof leaks, but not damage from maintenance failures or lack of repair.
Sudden roof leaks from storms, ice dams, or fallen branches are typically covered.
Gradual leaks from wear, aging, or deterioration are usually excluded. The insurance company may claim the leak resulted from lack of maintenance rather than sudden damage.
Pre-existing conditions that worsened from the leak may not be covered. For example, if an old roof was deteriorating for years, the insurance company may deny coverage, claiming maintenance was necessary.
Filing a Claim
Document the damage with photographs showing the leak location, water stains, damage extent, and any visible cause (fallen tree, etc.).
Notify insurance promptly when you discover the leak. Delays may be used to deny claims.
Obtain repair estimates from licensed contractors. Most insurance companies require estimates or proof of repair costs before paying claims.
Keep records of all repairs, materials, and labor costs. Insurance companies may request receipts as proof of expense.
Coverage Limits
Even covered leaks may have limits on what’s paid. Review your policy for:
- Deductibles: Often $500-$1,000 per claim
- Coverage limits: Maximum amounts paid for specific types of damage
- Exclusions: Types of damage not covered
Some policies have special provisions for water damage, potentially higher deductibles than other claims.
Preventing Future Roof Leaks
Maintenance Schedule
Annual inspection (spring) checks for winter damage, debris buildup, and deterioration. Look for missing shingles, damaged flashing, and ice dam potential.
Fall inspection (September-October) clears debris, checks gutters, and assesses roof condition before winter storms.
Post-storm inspection after major storms checks for obvious damage and addresses issues immediately before additional rain compounds problems.
Maintenance Tasks
Gutter cleaning prevents debris buildup that blocks water flow and causes backups that force water under shingles.
Debris removal from roof valleys and areas prone to accumulation.
Flashing inspection checking that caulk is intact and metal isn’t corroded.
Shingle inspection confirming shingles aren’t lifted, cracked, or missing.
Gutter maintenance ensures water drains properly from the roof.
Proper Ventilation
Attic ventilation prevents ice dams and moisture accumulation. Soffit and ridge vents or turbine vents should provide continuous air circulation.
Interior ventilation from bathrooms and kitchens shouldn’t exhaust into attics, as this introduces moisture.
Timely Replacement
When roofing reaches the end of its lifespan, replacement prevents multiple leaks and expensive emergency repairs. Most roofing materials last 15-30 years depending on type and climate.
FAQ: Roof Leaks and Water Damage
Q: How much does roof leak repair cost?
A: Minor flashing repairs cost $300-800. Shingle patches cost $200-600. Complete roof replacement costs $5,000-15,000 depending on roof size, material, and roof complexity. Insurance often covers sudden leaks, reducing out-of-pocket costs. See our water damage restoration cost guide for typical repair expenses.
Q: How long can you leave a roof leak before it causes serious damage?
A: Even small leaks can cause serious damage within weeks if water reaches framing, insulation, and wall cavities. Structural damage develops within months if water penetrates deeply. Mold can develop within 24-48 hours in warm, humid conditions. Roof leaks should be repaired within days of discovery to prevent extensive damage.
Q: Why does water appear in one room when the leak is in another?
A: Water travels along rafters, follows electrical wiring, and flows along any pathway offering less resistance than continuing downward. A leak in the roof may travel 20 feet along rafters before appearing as a ceiling stain. This is why finding the source requires attic investigation, not just looking at water stains.
Q: Can I repair a roof leak myself?
A: Small repairs like re-caulking flashing or replacing a few shingles are DIY-feasible if you’re comfortable on roofs. However, roof work is dangerous and one mistake can make leaks worse. For safety and warranty reasons, professional roofers are recommended for most repairs.
Q: Will my insurance cover a roof leak if I wait too long to repair it?
A: Delays may void insurance coverage. Insurance companies may argue that delays allowed preventable damage to occur, making the additional damage your responsibility. Report leaks immediately and obtain repair estimates promptly to preserve coverage.
Conclusion
Roof leaks are serious problems requiring prompt attention to prevent extensive water damage throughout your home. The key to managing roof leaks is finding the source, implementing temporary solutions quickly while arranging permanent repairs, and addressing interior damage to prevent mold and structural deterioration.
By maintaining your roof through regular inspections and prompt repairs, you prevent leaks from developing. When leaks do occur, professional roofing contractors ensure repairs address the root cause, preventing the leak from recurring and causing additional damage.
Understanding your insurance coverage and documenting damage properly ensures you receive appropriate compensation for repairs. For complex leaks where the source is difficult to locate or for leaks affecting structural elements, professional water damage restoration companies and roofing contractors should work together to fully address both the leak and resulting damage.
Disclaimer: This article is for informational purposes only and does not constitute professional advice. Every water damage situation is unique. Always consult a licensed contractor or restoration professional for your specific situation. If you’re dealing with an emergency, contact your local restoration company immediately.