The Critical Importance of Regular Water Damage Inspections
Water damage is often called a silent threat because it frequently develops undetected, behind walls and ceilings, until significant damage has already occurred. By the time visible signs appear—stains, soft spots, or mold—weeks or months of water exposure may have weakened structural elements, promoted mold growth, and degraded building materials.
Studies show that homeowners who conduct regular water damage inspections catch problems early, reducing average repair costs by 50-75% compared to those who only address water damage after visible problems appear. The difference between a $500 repair and a $15,000 restoration often comes down to catching a leak during inspection rather than discovering it after catastrophic failure.
This guide provides a comprehensive inspection schedule and specific steps to systematically check your home for water damage throughout the year.
Key Takeaway: A simple 15-20 minute monthly walk-through of high-risk areas—under sinks, around toilets, near the water heater, and in the basement—catches the majority of developing water problems before they become expensive emergencies.
Recommended Inspection Frequency
The Ideal Inspection Schedule
Monthly inspections: Quick 15-20 minute visual checks focusing on high-risk areas
Seasonal inspections: Comprehensive 30-45 minute inspections before major seasonal changes
Annual professional inspection: Detailed assessment by qualified professionals
After major events: Inspections following storms, heavy rain, or extreme weather
Monthly Quick Checks (High-Risk Areas)
Spend 15-20 minutes monthly inspecting these critical areas:
Bathrooms:
- Look under sinks for water stains or soft cabinets
- Check tile grout for cracks or discoloration
- Inspect the toilet base for water seepage
- Verify caulking is intact around tub and shower — see our bathroom water damage prevention checklist
Kitchens:
- Check under sinks for signs of leaks
- Inspect around dishwasher connections
- Look for water stains on cabinet bottoms
- Verify refrigerator ice maker line has no cracks
Basement/Crawlspace:
- Look for efflorescence (white mineral deposits) on walls
- Check for standing water or dampness
- Inspect sump pump operation (if equipped)
- Look for condensation on pipes or structural elements
Exterior:
- Check gutters for debris or damage
- Look for water pooling near the foundation
- Inspect downspout extensions directing water away from home
- Verify grading slopes away from foundation
Seasonal Comprehensive Inspections
Conduct 30-45 minute comprehensive inspections four times per year:
Spring (March-April):
- Inspect roof for winter storm damage or missing shingles
- Check attic for leaks caused by melting snow or ice damming
- Inspect foundation for cracks that may allow water entry
- Check basement for water stains from spring thaw and rain
- Test sump pump operation after winter dormancy
- Inspect window frames and sills for water infiltration
- Check basement walls for new cracks or seepage
Summer (July-August):
- Inspect AC condensate drainage system
- Check washing machine supply hoses for deterioration
- Verify water heater and connections are dry
- Inspect basement for moisture before dry season ends
- Check attic ventilation is clear and functioning
- Inspect exterior caulking and sealants for gaps
- Check for signs of active leaks during heavy use
Fall (September-October):
- Inspect roof before winter weather arrives
- Clean gutters completely of leaves and debris
- Check attic for proper ventilation before winter
- Inspect windows and doors for proper sealing
- Verify basement is dry before potential fall rains
- Check foundation grading directs water away
- Inspect exterior paint for peeling (indicates moisture issues)
Winter (December-January):
- Inspect attic for ice dam damage or leaks
- Check basement for moisture accumulation from melting snow
- Inspect pipes for condensation or frost (freeze risk)
- Verify attic insulation isn’t blocking ventilation
- Check that gutters remain clear of ice and water
- Inspect for drafts that may indicate air/water leaks
- Monitor basement humidity levels
Room-by-Room Water Damage Inspection Checklist
Attic
The attic is where roof leaks manifest first and where water damage can hide for months:
What to look for:
- Water stains or discoloration on rafters, beams, or sheathing — learn to recognize signs of hidden water damage early
- Soft, spongy, or deteriorating wood
- Mold or mildew growth (dark spots or fuzzy growth)
- Wet insulation (dry insulation is light and fluffy; wet insulation is dark and compressed)
- Visible leaks during or after rain
- Adequate ventilation (airflow is important for preventing moisture buildup)
How to inspect:
- Use a flashlight to thoroughly examine all visible areas
- Press on wood with a screwdriver—solid wood resists, rotted wood indents easily
- Look at sheathing and rafters, not just insulation
- Check around pipe penetrations and flashing
- Visually trace water paths if you see evidence of water entry
After dealing with this issue hundreds of times, the most common area homeowners miss during attic inspections is around bathroom vent penetrations—these are often poorly sealed from the start and gradually allow water intrusion that goes unnoticed for years.
Roof
The roof is your home’s primary defense against water. Regular inspection prevents catastrophic leaks:
What to look for:
- Missing, cracked, or curled shingles
- Damaged flashing around chimneys, vents, and valleys
- Granule loss (small gravel-like material) in gutters
- Sagging or dipping roof line
- Visible holes or punctures
- Loose or missing mortar around chimneys
- Ice dam formations in winter
How to inspect:
- Use binoculars to inspect from ground level (safest approach)
- If accessing the roof, use proper safety equipment and precautions
- Walk the entire roof perimeter
- Check all valleys and transitions where water typically collects
- Inspect around all penetrations (vents, chimneys, antennas)
- Have a professional inspect if the roof is steep or if you’re uncomfortable with heights
Basement
Basements are the lowest point of your home and water’s natural destination:
What to look for:
- Water stains on walls or floors
- Efflorescence (white mineral deposits indicating past water penetration)
- Soft or rotting wood framing or subflooring
- Condensation on pipes or walls
- Mold growth on walls, floors, or insulation
- Cracks in foundation walls or floor
- Standing water or dampness
- Musty odors indicating moisture
How to inspect:
- Examine all walls, particularly corners where water tends to collect
- Press on wood framing to test for soft spots
- Look for water stains at the base of walls (water naturally settles at low points)
- Check around window wells and basement windows
- Inspect sump pump operation and discharge location
- Use moisture meters in suspicious areas
- Check utility penetrations where pipes/wires enter
Walls and Ceilings
Interior water damage often manifests as stains, discoloration, or soft spots:
What to look for:
- Water stains (brown, yellow, or tan discoloration)
- Bubbling, peeling, or flaking paint
- Soft drywall (indicates water saturation)
- Sagging areas suggesting water accumulation
- Mold growth (green, black, or fuzzy spots)
- Warped or buckled drywall
- Visible seams or tape separation
- Musty odors
How to inspect:
- Run your hand over surfaces to detect soft spots
- Press firmly on drywall to test integrity
- Look near ceiling edges where water often runs
- Check around windows and doors where water infiltration occurs
- Examine corners where two walls meet
- Look up at ceilings, particularly under bathrooms and kitchens on upper floors
Bathrooms
Bathrooms have constant moisture and multiple potential leak sources:
What to look for:
- Water under sinks or around drains
- Soft cabinets (indicates water damage)
- Cracked or missing grout in tile
- Caulk separation or gaps around tubs and showers
- Water stains on ceilings below bathrooms (in lower levels)
- Mold growth on tile, grout, or caulk
- Leaking toilet bases (water beneath or around toilet)
- Loose or shifting tiles
How to inspect:
- Open cabinet doors under all sinks and look for wet materials
- Visually trace all water lines from faucets and drains
- Inspect all grout lines for cracks
- Check caulk around tubs and showers (it deteriorates over time)
- Test toilet bases by feeling the floor for softness
- Look at ceiling paint in rooms directly below bathrooms
- Turn on all fixtures and verify water goes down drain properly
Kitchen
Kitchens contain multiple water sources—sinks, dishwashers, refrigerators, and water lines:
What to look for:
- Water under sinks or around drain areas
- Soft or water-damaged cabinetry
- Leaking dishwasher connections
- Refrigerator ice maker line issues
- Water stains on flooring or subfloor
- Mold growth under appliances
- Deteriorating caulk around sinks
- Water damage around water heater (if located in kitchen)
How to inspect:
- Open all cabinets under sinks with faucets
- Look behind and under appliances
- Check where water supply lines enter appliances
- Inspect flooring for stains or soft spots
- Check grout around countertops and backsplash
- Verify caulk integrity around sink rim
- Check that drain lines are not leaking
Laundry Room
Washing machines and water heaters often create damage in laundry areas:
What to look for:
- Water around washing machine base or connections
- Water stains on flooring
- Leaking water heater (if located here)
- Soft flooring or subfloor
- Deteriorated hoses or connections
- Water accumulation under appliances
- Mold or mildew growth
How to inspect:
- Check all hose connections for tightness and leaks
- Inspect hoses for bulges, cracks, or soft spots
- Look under and behind the washer
- Check water heater for leaks or corrosion
- Inspect flooring around these appliances
- Look for water stains indicating past leaks
- Check drain locations and verify proper drainage
Crawlspace
Crawlspaces are vulnerable to moisture problems:
What to look for:
- Standing water or dampness
- Moisture on exposed wood or insulation
- Mold growth on any surfaces
- Deteriorated wood framing
- Condensation on pipes
- Water stains on support beams
- Improper drainage around foundation
How to inspect:
- Use proper safety equipment and ventilation when entering crawlspace
- Look for visible water or wet areas
- Check vapor barrier integrity (should cover ground)
- Inspect wood supports for rot or deterioration
- Look for mold growth on any surfaces
- Check that drainage is functioning properly
What to Look For During Water Damage Inspection
Visual Warning Signs
Discoloration and staining:
- Yellow, brown, or tan marks on walls or ceilings
- Expanding stain patterns suggesting ongoing water intrusion
- Rust-colored stains around metal fixtures (indicating water exposure)
Structural indicators:
- Soft spots when pressing on drywall, wood, or flooring
- Sagging areas in ceilings or walls
- Warped or buckled materials
- Paint bubbling or peeling
- Separated seams or tape on drywall
Growth and biological signs:
- Mold growth (green, black, white, or orange)
- Mildew (surface fungus with musty smell)
- Pest activity (moisture attracts insects)
Odors:
- Musty smells indicate moisture accumulation
- Earthy, moldy odors suggest mold or mildew
- Sour smells can indicate trapped water in walls
Tools for Enhanced Detection
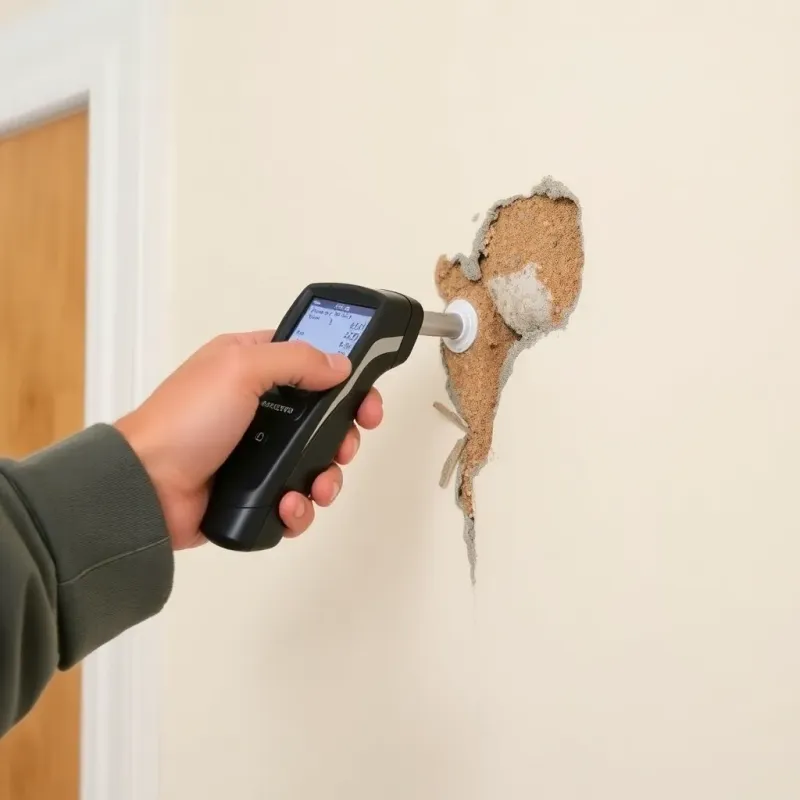
Moisture meters: Electronic devices that measure wood moisture content. Dry wood measures 6-11%; water-damaged wood measures 15%+. Cost: $30-150
Thermal imaging cameras: Detect temperature differences indicating moisture accumulation or water intrusion. Cost: $100-500 (or rent for $30-50/day)
Borescope cameras: Small cameras that can inspect inside walls or hard-to-reach spaces. Cost: $50-200
Flashlight/headlamp: Essential for illuminating dark spaces like attics and crawlspaces. Cost: $20-50
Moisture probe: Simple device to detect moisture in materials. Cost: $15-50
Benefits of Professional Water Damage Inspections
What Professionals Provide
Professional inspectors bring expertise, equipment, and documentation that homeowners often lack:
- Comprehensive assessment covering areas homeowners typically miss
- Advanced equipment like thermal imaging and professional moisture meters
- Expert interpretation of subtle signs indicating developing problems
- Written reports documenting findings with photos
- Repair recommendations prioritized by urgency and importance
- Insurance documentation for claim purposes
When to Schedule Professional Inspections
Annual professional inspections are recommended for:
- Homes older than 10 years
- Homes with history of water damage
- Homes in areas with heavy rain or snow
- Homes with flat roofs (higher leak risk)
- Homes being considered for purchase (pre-purchase inspection)
Additional professional inspections should occur:
- After major storms or weather events
- When water damage is suspected
- Before and after insurance claims
- When selling your home
- If previous water damage was professionally remediated
Professional Inspection Costs
- Standard home water damage inspection: $200-400
- Comprehensive whole-home inspection: $400-800
- Mold inspection (if needed): $300-600
- Thermal imaging (if added): $100-300
These costs are minimal compared to the potential savings from early problem detection.
Creating Your Personal Inspection Schedule
Monthly Checklist (15-20 minutes)
- Inspect under all sinks for leaks or water stains
- Check toilet bases for water seepage
- Look at basement or crawlspace for moisture
- Verify gutters aren’t overflowing
- Check AC condensate drain for water flow
- Inspect washing machine hose connections
Seasonal Checklist (30-45 minutes)
Spring, Summer, Fall, and Winter versions of:
- Inspect attic for leaks and proper ventilation
- Check roof (from ground with binoculars)
- Inspect basement thoroughly
- Check all wall and ceiling areas for new stains
- Verify all drain systems functioning properly
- Inspect foundation for new cracks
- Test sump pump (if applicable)
- Check grading slopes away from foundation
Annual Professional Inspection
- Schedule appointment 2-3 months before end of year
- Provide inspector with history of any past water damage
- Ask for written report with photos
- Discuss findings and recommendations
- Create plan for addressing identified issues
- Keep report for insurance and future reference
FAQ About Home Water Damage Inspections
Q: Can I do water damage inspections myself, or do I need a professional? A: You should absolutely conduct regular visual inspections yourself monthly and seasonally. However, professional inspections are valuable for advanced detection and comprehensive assessment, particularly for older homes or those with previous water damage.
Q: What’s the difference between a water damage inspector and a home inspector? A: Home inspectors provide general home assessments including many systems. Water damage specialists focus specifically on water intrusion, moisture detection, and water damage risks. For detailed water damage assessment, specialists are preferable.
Q: How much does it cost to repair water damage if I catch it early? A: Early detection often means repairs cost $500-2,000. Undetected water damage can exceed $10,000-20,000. The inspection investment pays for itself many times over through early problem identification.
Q: What should I do if I find evidence of water damage during inspection? A: Take photos, document the location and extent, then call a water damage restoration company for assessment. Avoid disturbing the area if mold may be present, as disturbing mold can release spores.
Q: How often should I have the roof professionally inspected? A: Have roofs inspected annually, particularly after age 10. Inspect more frequently if the roof is approaching the end of its expected lifespan (typically 15-25 years depending on materials).
Q: Can moisture meters accurately detect water damage? A: Moisture meters are helpful tools but not definitive. They measure moisture content but can’t distinguish between condensation and actual water damage. Use them as part of a comprehensive assessment, not as the sole diagnostic tool.
Conclusion
Regular water damage inspections are your first line of defense against costly water damage. By committing to monthly visual checks, seasonal comprehensive inspections, and annual professional assessments, you create a system that catches problems early—when they’re most affordable to fix.
The inspection schedule outlined in this guide—monthly quick checks (15-20 minutes), seasonal thorough inspections (30-45 minutes), and annual professional inspections—requires minimal time investment while providing maximum protection for your home.
Start implementing this inspection schedule today. Mark your calendar for monthly checks, set seasonal inspection dates, and schedule a professional inspection within the next few months. The peace of mind and financial savings from early water damage detection far exceed the modest time investment required.
Remember: water damage is progressive. A small leak today becomes major damage in weeks without intervention. Regular inspections empower you to address problems before they become catastrophes.
Disclaimer: This article is for informational purposes only and does not constitute professional advice. Every water damage situation is unique. Always consult a licensed contractor or restoration professional for your specific situation. If you’re dealing with an emergency, contact your local restoration company immediately.